
Google’s Webmaster Tools (GWT) show you clearly how Internet users find your website through Google’s search results. You can learn, for example, what search terms result in your site being displayed and which of these are the top queries for your website.
Registering with Google Webmaster Tools and verifying your website
You need to visit Google’s Webmaster Tools site and sign in using your Google account. This is the image you will see when you visit the site:

Just click on the ‘Sign in to Webmaster Tools’ button and follow the instructions to enter username and password. Once you are on the site, you will see a button, ‘ADD A SITE’ and you will be able to add the web address (URL) of your website.
Before any results are reported, you will need to verify that you are the owner of the website. Google Webmaster Tools explains how to do this and one of the options is to copy a verification file to your website (so that Google can check that you actually have Webmaster rights/access to the site you listed).
Once you are verified, you will then need to be patient as Google takes some time to crawl your site and start reporting results. I would give it a few days if you want to get anything meaningful. The Google bots take holidays too – they don’t visit your site every day (unless your site is a really top ranked site or is updated daily and you let Google know about it).
What the Webmaster Tools tell you about how people find you in Google search results
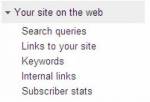
Webmaster Tools provides information to show you how your site is seen on the web – it covers search queries, links to your site, keywords, internal links and subscriber statistics. This information is accessible via the left hand menu:

What I want to focus on in this post, is the ‘search queries’ information and its implications. If you click on “search queries” in Webmaster Tools, you can find out valuable information about your website:
- Queries: the total number of different search queries in Google that resulted in your site being displayed; this is the number of search terms that generated a listing of your site in Google’s search results (for the period you specify).
- Query: a search term used by an Internet searcher that resulted in your website being listed in the Google search results; Google lists the top search terms (in descending order of frequency) that result in your website appearing in Google’s search results.
- Impressions: the number of times one of your web pages appears in the Google search results for viewing by someone who searches on Google; Google gives you the total number of impressions ordered by query, along with the percentage change over the previous period.
- Clickthrough Rate (CTR): how many times your website impressions (appearances in Google’s search results) produced a click; Google expresses the clickthrough rate as a percentage (number of clicks as a percentage of number of impressions).
- Average Position: what position on the search results your website appeared at for a specified query; Google expresses this as an average position and shows the change in terms of ‘+’ or ‘–‘ the number of positions (improvements in position are shown in green).
So through the Webmaster Tools you can learn the total number of Google ‘queries’ that resulted in your site being displayed. You can establish what Google search queries were used to locate your site and which of these search terms generated the most traffic. You can also establish which search terms resulted in the most clicks. The other valuable piece of information is your average page rank for a particular query (which will impact heavily on your impressions and clickthrough rate).
In the following diagram, I show how Google illustrates these results (this is the result over two days for my new site, a day after I registered the site on Webmaster Tools):

To access this representation of your search queries results, you click on ‘more’ at the end of your ‘query’ listing and the illustration will appear. The image above is for ‘top queries’ and the illustration below is for ‘top pages’ (you can choose these options by using the tabs at the top left).

At the top on the left hand side, there is a button ‘Filters’ that allows you to set parameters for the displayed information, e.g. by geography.
Mining the riches of Webmaster Tools
There is a lot more to Google’s Webmaster Tools than at first meets the eye. As you go deeper into this Google tool, you can find a rich store of information that can help your site get indexed better by Google, crawled more often by the Google bots, displayed more frequently in search results and visited more often – it’s up to you to tell Google what you want.
In subsequent posts, I will explore some of the things that you can do based on other information that is available in Google’s Webmaster Tools:
- What to do if you don’t like your search query results shown on Webmaster Tools
- How to improve Google’s indexing of your targeted keywords
- How to improve backlinking for your website
- What to do to create more internal links
- How to create and submit a sitemap
- What to do about Google’s diagnosis of your website.
These topics alone demonstrate how important it is to use the Webmaster Tools to understand how people find your site on Google and how Google actually ‘sees’ your site.