Creating Your Profile on Google Plus

Giant Squid100

Google Plus Profile

Your Profile Page on Google Plus is very significant, as it is on other social networks.  Here is your opportunity to brand yourself and your small business.   Profiles on social networks are a core element of small business marketing but are often rushed and rarely updated.

Google will automatically import your Google Profile if you have created one before, so all you will need to do is to edit it to bring it up to date.

As I mentioned in my previous blog post, you can create or edit your profile via the Google Plus toolbar or via the icon at the top of your Google Plus page (identified in the illustration below):

Google Plus - edit profile


Creating your Google Plus Profile

Here is an opportunity to provide a comprehensive profile that adds credibility to yourself and your small business.  It is really critical that you add a photo of yourself to reinforce that you and your business are real.

The Google Plus Profile offers you the opportunity to provide a comprehensive picture of yourself in line with your focus at the time.  Here are the key details you can record in your Profile:

  • Tagline – a brief description of yourself (related to your small business focus?) – you can see my tagline, ‘Creative entrepreneur who loves to write and help people be the best they can be’, in the above image.
  • Introduction – an overview of yourself
  • Employment – opportunity to mention your small business
  • Education – can reinforce your credibility and small business focus
  • Bragging Rights – something personal or small business related (Small Business Award?)
  • Occupation – relate to your small business
  • Places Lived – this is shown by “pegs” in a map
  • Relationship – share your relationship status
  • Looking for – disclose what you are comfortable with (use “Networking’ if you want to keep Google Plus for professional purposes)
  • Gender
  • Profile Discovery – can set this to ‘Help others find me in search’ (shown as ‘Profile visible in search’)

The right hand column provides a great opportunity to display important links.  You can add URL’s and descriptions under the following three (3) headings:

  1. Other profiles – other sites that give insight into who you are and what your interests are
  2. Contributor to – what sites feature your work
  3. Recommended link – add the URL and description of pages that interest you (include your small business blog or website).

These links are really important to enable you to direct people to your personal branding elsewhere and to connect them to your small business.  By way of example, I have included information about my Google+ Profile links below.

 Under ‘other profiles’, I have linked people to the following sites:

Under  ‘Contributor to’, I have created the following links:

Under ‘Recommended links’, I have listed the following:

The list of links above highlight the fact that the more you create online content, the more you have to share through your small business marketing online.  Google Plus gives you the option of deciding who will have access to these links as part of its privacy options.  These options are displayed as a drop-down menu under each of the categories of links mentioned above.

The discussion in this blog post highlights how your Google Plus Profile can build your personal brand on line and increase the penetration of your small business marketing.

Tell the Google Bots Where To Go!

Lazy Bot

site map with links


When I discussed Webmaster Tools earlier, I mentioned the need to create a sitemap for your website and submit it to Google.  I will discuss how to do the creation and submission of a site map in this post because it is critical to the indexing of your website by Google and determines how your website will be found through search queries on Google (and other search engines).

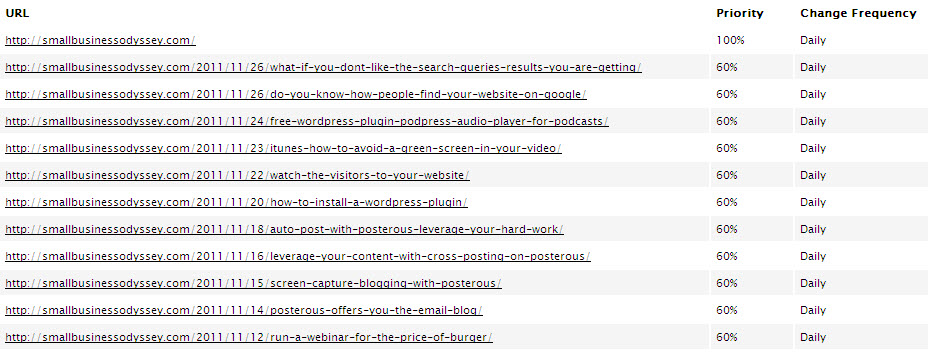
A sitemap is basically, as the name suggests, a map or directory of your website, so that the structure and priority of the files on your website can be displayed for easy access by the search engines.   You can see from the sitemap extract above that the sitemap for Small Business Odyssey has a hyperlinked list of files, a priority rating (percentage) and a frequency rating (to tell the search engines how frequently to index that part of the website).  

Why create a sitemap and why submit it to Webmaster Tools?

Lazy BotWell, in non-technical language, it seems that the Google Bots (robots that crawl your website) are lazy ‘creatures” and do not go out of their way to properly index your site for the Google search engine.  They take the easy way out – they only go where the path is clearly laid out for them.  They don’t like deadends (broken links) or confused pathways (disconnected files randomly located).   When I look at how Google is currently indexing my Small Business Odyssey blog, I am even more convinced of how lazy the Google Bots are – it seems that they need to be spoon-fed the information, otherwise they do a poor job of indexing your website.

So the primary reason for creating a sitemap for Google is to enable the Google Bots to comprehensively index your website.   Otherwise, a lot of your website may not appear in Google’s index and will not be found by Internet searchers.  Google admits as much by this comment on Webmaster Tools:

Submit a Sitemap to tell Google about pages on your site we might not otherwise discover.

Creating an XML Sitemap

This brings us to the creation of a sitemap.  I am suggesting that you create this sitemap initially as a .XML file because it is easy for the lazy Bots to read completely.  This sitemap format basically lets the Google Bots into the back engine room of your site and shows them around – where files are located and how they are linked by type (home page, static pages, dynamic pages, categories, tags).

If this post appears too technical for you, just make sure that your Webmaster has created an XML sitemap for your website and submitted it to Google.  

Here are the steps for creation of your XML sitemap:

  1. Download the free WordPress Plugin for the Google XML Sitemap Generator.
  2. Upload the XML Sitemap Generator to your website (via your WordPress Admin panel)
  3. Make adjustments to the default settings (if you wish)
  4. Click ‘create sitemap’ and you will very quickly have a site map and a stated location (URL) for your sitemap.

The beauty of this WordPress Plugin for creating Google XML Sitemaps is that it offers multiple options in terms of settings, automatically submits the sitemap to Google, Ask.com and Bing search engines and updates automatically when you change a file on your website.  So it is comprehensive and dynamic.

In terms of adjustments to default settings, most commentators suggest that you leave the defaults as they are – it certainly makes life simpler.  However, I would suggest that you may want to change the default for ‘priority’ – the default setting tells the Google Bots to give priority to the posts that have the most comments.  This may not be meaningful if you have a really new site.  I have set up my priorities in the following order –  home page, recent posts, static pages, older posts, categories and tags.  I will change this as the Small Business Odyssey site becomes more established and generates more traffic and comments. 

The other default setting you may want to change before you click the “create sitemap’ button, is ‘Change Frequency’. For example, the default setting tells the Google Bots to index your posts weekly.   However, if you are creating blog posts on a daily basis, you should change the ‘frequency’ to daily.  The Google Bots may ignore this suggestion (remember they are basically lazy), but it is better to at least express your wishes.  Google’s own experts, such as Matt Cutts, tell us that the more frequently you update your site with relevant information, the more often the Google Bots will crawl your site and the deeper (more thoroughly) they will index your website.

I’ve made a few adjustments to the priority and frequency default settings for my XML sitemap and you can see the result here:

http://smallbusinessodyssey.com/sitemap.xml

Here’s a YouTube video that simplifies the whole process and shows you exactly what to do (there are no adjustments to defaults and the WordPress Plugin is downloaded directly to the Admin panel via the built-in Plugin search facility): 


How to submit your XML sitemap to Google’s Webmaster Tools 

You might wonder why we need to do this extra step as the WordPress XML Sitemap Generator automatically submits your sitemap to Google (and to Bing and Ask.com).  Well, I think it comes back to our lazy Google Bots again – they don’t go out of their way to find the sitemap, so you have to put it in front of them!   If you check out the screenshots below, you will also see how Google takes up the information from the sitemap on Webmaster Tools and begins to integrate it into its index.  So submitting the sitemap to Google’s Webmaster Tools is a way to get direct access to Google’s index (although it may take some time for all of the information to be indexed).

The process of submission of your sitemap to Google’s Webmaster Tools is very simple:

  1. log in to your Webmaster Tools site
  2. click on the web address (URL) for your verified website 
  3. click the ‘site configuration’ menu item
  4. click the ‘sitemaps’ menu item
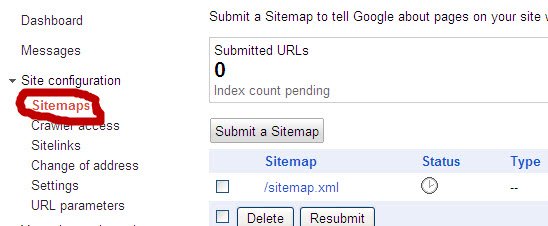
  5. enter your sitemap address where indicated (see image below).

  sitemap submission to webmaster tools

When you first submit your sitemap, the above image will appear with the messages ‘submitted URLs – O’ and “index count pending’ (and status shown as ‘in progress’).   Take heart, this is Google trying to identify all your files from the sitemap and integrating them into their index.   After some processing time, you will see the following image that indicates successful submission:

Google indexing sitemap on Webmaster Tools

So this indicates that Google has taken on board your website pages (URLs) and has loaded them into their index.  The actual indexing in terms of search terms (keywords) will occur over an unspecified period (you can’t rush the Google Bots).

Creating and submitting an XML sitemap to Google’s Webmaster Tools is critical for small business marketing because it ensures effective indexing of your website so that Internet searchers can find your website through your targeted search terms (keywords).

Auto-Post with Posterous: Leverage Your Hard Work

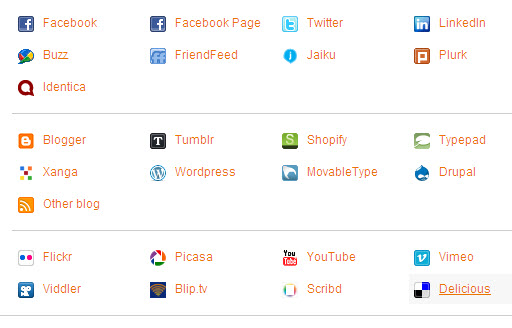
Social Media sites for auto-posting with Posterous

Posterous enables you to broadcast your Posterous blog post (whether or not it was created by email, screen capture or onsite blogging).  You can also specify a target for a specific email post, e.g. twitter@posterous.com.

You can set up the specific accounts in the “autopost” area of your Posterous site to advise where to broadcast your blog post.  The above image lists the social media sites that you can auto-post to with Posterous.

Posterous, through email and screen capture blogging, gives you the power to leverage your online content (blog posts, articles, Squidoo lenses, Hub pages, videos. podcasts).  The autopost facility allows you to levrage your hard work in creating online content by simultaneous broadcast to other social networking sites.

At the time of writing, I have set up my site to post my Posterous blog posts (however created) to my Affiliate Marketing Coach blog (Blogger.com)  and to my Facebook site.    So you can set up a sequence of auto-posting that suits your style of operating and fits with your small business marketing strategy.

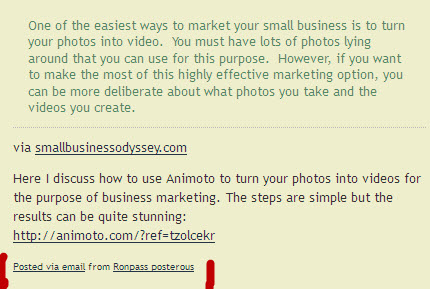
Here is an example of where Posterous has created an autopost to my Affiliate Marketing Coach blog from a Posterous screen capture post I created from this Small Business Odyssey blog:

The original blog post on Small Business Odyssey was posted to my Posterous blog via the screen capture bookmarklet.  I have added a comment and a link to my target URL (automatically hyperlinked) and Posterous has auto-posted the Posterous blog entry to my Blogger.com blog.

You have the option of letting Posterous post directly to each site you nominate or have it feed into one of your sites that is set up to auto-generate other posts.

You are limited only by your imagination with respect to the range of content that you can capture, and the means of achieving leverage.  In this example, my AudioBoo podcast is automatically posted to my Posterous account which in turn posts to my blog, Twitter and Facebook:

 Posterous and AudioBoo autopost

So there are a number of options for using the autopost feature of Posterous.  Here are three of them:

  1. Allow Posterous to autopost directly to your selected social media sites
  2. Allow Posterous to autopost to another site (e.g. Twitter) which in turn is set up to autopost to other sites (such as Facebook)
  3. Allow another site (e.g. AudioBoo) to autopost to your Posterous blog and setup the latter to autopost to selected sites.

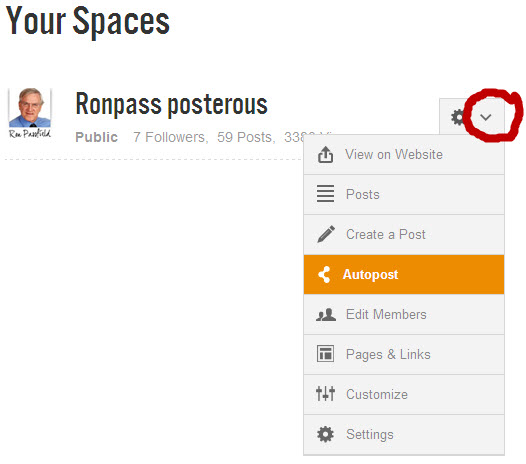
The autopost option is located under “Manage Spaces” – you need to click on the down arrow as highlighted in the image below so that the menu displays with the autopost option:

Posterous autopost

Posterous through its email blogging and screen capture blogging supports an array of options for auto-posting and creating leverage for your online content as part of your small business marketing.
Free WordPress Plugin: All in One SEO

Free WordPress Plugin
Wordpress plugin


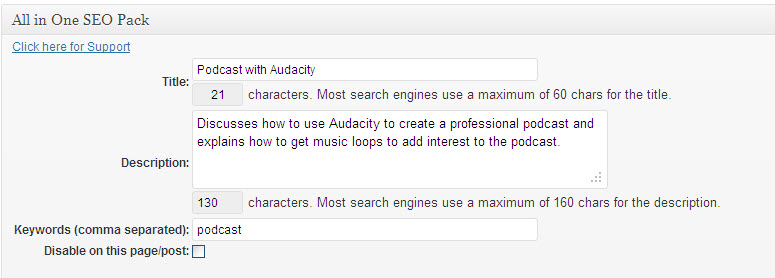
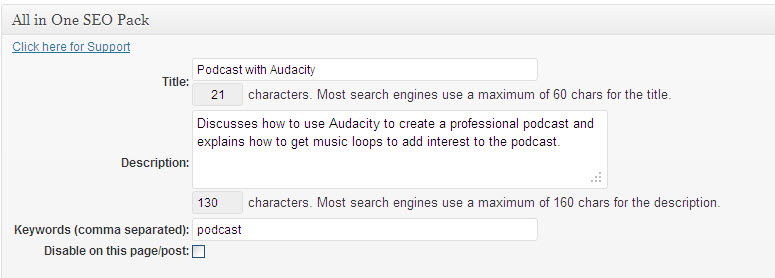
All in One SEO Plugin is a free WordPress Plugin that enables you to very easily optimize your blog posts for the search engines.  It also forms the foundation for the analysis and research conducted by the more sophisticated WordPress Plugin, SEOPressor, described in an earlier post.

As you can see from the image above, there are three main sections of the All in One SEO plugin you need to complete for each blog post to enable the search engines to readily locate your content.  The three main aspects of this free WordPress Plugin are keyword, title and description.

Keyword for All in One SEO WordPress Plugin

It is really important to decide the primary keyword for your blog post (and the Free WordPress Plugin). The primary keyword should determine the title and the description. The keyword chosen should be governed by the content and the purpose of your article and your market research.

Title for the All in One SEO WordPress Plugin

The title should include the primary keyword and, where possible, another related keyword. However, it is important to avoid keyword stuffing otherwise your site will be penalized by Google. One of the real benefits of the All in One SEO WordPress Plugin is the ability to provide a catchy, “sexy” title for your blog post to engage the reader and then to have a more SEO-aware title for the search engines.

Description for the All in One SEO WordPress Plugin

The description should contain the primary keyword at least twice but needs to be conversational in nature – it has to be a meaningful sentence(s). The important thing with the description is to keep the reader in mind – who are they and what do they want in relation to your blog post? What problems or issues are you solving with your post?

Not only does the All in One SEO Plugin help you with your title and description, it also gives you a recommended length for each based on how search engines treat these aspects of blog posts.

The free All in One SEO WordPress Plugin can help you make your blog posts reader-friendly and, at the same time, improve the search engine  results for these posts – thus boosting the marketing of your small business online.