How to Overcome Writer’s Block to Improve Your Productivity

Writer's Block

 Writer's Block

Writer’s block is the curse of all writers, whether writing online or offline.  Even the great novelists report that at times they experienced writer’s block.  

In an earlier blog post, I offered suggestions on how to achieve your daily blogging goal.  That blog post on daily blogging focused mainly on creating productive habits and establishing a routine. But what happens if, despite your routine, you are lost for words on a particular day when you want to write?  What if, despite your best efforts, no ideas come to mind? 

Well, there are a couple of strategies that I use that you might find useful to help you overcome writer’s block and improve your productivity. 

[Photo credit: Writer’s Block by orijinal

Strategies to Overcome Writer’s Block 

I have developed these strategies over time while writing both technical and popular articles and blog posts.  They have really helped me overcome writer’s block

1. Talk to the computer

This sounds a bit strange but it is a valuable technique.  I learned this approach from a colleague when we were doing an Australia-wide research project on action learning.  Whenever we got stuck for writing, he would go to the keyboard and start typing questions like:

  • What do I want to say here?
  • Who am I saying this to?
  • What’s the key message that I want to get across?
  • Why would I bother to write this?
  • What can the reader learn from what I am writing?

 He would then progressively start to answer these questions as if they were questions asked of him by the computer.  Invariably, we would have no trouble progressing once we responded to his questions on the computer. 

2. Record yourself – create a podcast 

Sometimes the act of writing is itself an impediment to what you want to say – you can’t find the right words to start.  What I have done to overcome this particular writer’s block is to use an audio recorder, my smartphone or a program like Audacity or AudioBoo to record what I want to say.  When you move to the auditory channel, your natural instincts to edit are turned off, so a natural speaking flow can occur.  You can then type from the audio and play around with the grammar and structure.  You could use the questions mentioned in (1) to get started.  It is amazing how using a different communication channel can free up your ideas (and overcome innate fears that can cause writer’s block). 

3. Speed writing 

This is a real challenge to the perfectionist who may suffer from fear of failure or fear of success.  It is a similar idea to the previous one but here you stick with writing as the primary task.  However, instead of concerning yourself with structure, grammar, spelling or complete sentences, you just write any idea that comes into your head about the topic that is the focus of your attention.  What you will find is that one idea will lead to another and you will find new ways to develop ideas mentioned earlier in your speed writing.  It takes a bit of work to edit the writing, but at least you will have captured the ideas and linkages – you just need to structure them and edit your expression. 

Speed writing can really free up writer’s block because it enables you to overcome your lifetime conditioning – having to proceed in a logical way and write perfect sentences. The speed writing approach stresses lateral thinking and randomness, and activates the right brain.  Eventually, you need to activate your left brain to impose some order on what you have written.  The speed writing process can really help you overcome writer’s block by tapping into a part of your brain (the right side) that you may not use on a regular basis (depending on your type of work).  

4. Record a reflection 

Yesterday I was lost for a topic, so I reflected on what helped me to become productive with my blogging.  This led to my extended post on the how you can use focus to improve productivity.  That blog post started out as some random ideas that I thought I could write 200 words on and it ended up as a 7 point article of more than 1,200 words.  So even if you are slow to start writing, the very act of starting can loosen up your mind and capture the connections that are already resident there.  In the case of the focus blog post, I ended up jotting down some key points that turned into the 7 reasons why focus helps to improve productivity. 

This current post came about because I was experiencing writer’s block and was reflecting on how I had overcome it in the past – hence the focus of the article. 

5. Don’t try for perfection every time 

It’s better to write something, however short, rather than nothing.  The more you write, the easier it gets. Not every blog post is going to be a ‘pillar article’.  So it’s worth persisting and settling for something that may be good but not great.  Action generates ideas and ideas build on each other. 

If you want to be productive with your blogging, you need to explore strategies to overcome writer’s block – hopefully, my strategies will prove fruitful for you too.


How I Created an Animated Music Video from my Montville Photos with Animoto

image of Animoto HD video - View from Montville

image of Animoto HD video - View from Montville  

Animoto is a state-of-the-art program that enables you to very easily convert photos into animated, music videos.  In a previous post, I discussed three levels of membership of Animoto – Free, Plus and Business. 

In this post, I want to focus on how I created an Animoto video from photos taken during my recent visit to Montville.  First let’s look at how Animoto can make you look professional and improve your productivity.

Creating an animated music video from your photos with Animoto

I had taken 35 photos at Montville with my Panasonic Camera and I wanted to present them as a group under a theme.  I had previously taken out Animoto Plus membership ($30 per year) so I can now create as many non-commercial videos of whatever length I want.  So here is the process: 

  • Decide the theme and title for the video – I chose, ‘View fromMontville’ 
  • Upload the photos to Animoto – I uploaded the folder with the photos and Animoto assigned spots for them and progressively uploaded them.  This can take a while if you have a slow connection.  While I have a fast connection, I was still able to use the waiting time to clean up some of my email.  
  • Decide the sequence of the photos for the video – you can move the photos around to change the sequence (drag-and-drop).  I left the photos in the sequence in which I took them. 
  • Highlight photos to stand out as stills – this was a simple process of highlighting a photo and clicking on the ‘highlight button’.  This facility enables you to have a few photos that feature (they will be stills during the animated video and one will typically come into focus at the end – a really cool feature). 
  • Add a text slide – this comes with a headline and a single text line.  I chose to use the video title. ‘View from Montville’, and the sub-title, ‘Sounds of Mountain Birds’ (there is a limitation on the number of characters).  Again you can locate the text slide where you choose (via the drag-and-drop option). 
  • Decide the accompanying music – Animoto provides a music library covering a range of genres.  I chose to use my own audio – the MP3 I created by using Audacity to edit the recorded sounds of birds (developed through the voice recorder on my Samsung Galaxy S11).  One of the tricks here is to match the chosen audio to the length of your video (determined by the number of photos).  I had to expand my previously recorded audio to cover the number of photos involved.  I originally uploaded a 1.18 minute audio and Animoto identified about 8 photos that would not be included in the video because the audio was too short.  So I expanded the MP3 to 2.15 minutes (I had lots of recordings of bird sounds via my Samsung phone).   The resultant video is 1.24 minutes long.  A rule of thumb then that you can use is 2.15 minutes of audio to cover 35 photos (there is obviously some compression of the audio which is done automatically by Animoto). 
  • Decide the quality you want for your video – I discovered that there are some relatively new options for this.  The basic quality (350p) comes at no additional cost. At the moment you can improve the quality by choosing the 480p option ($3) or the high definition 720p option ($6).  I chose the latter because it really makes a difference to a video that involves mainly scenes taken from a distance (the HD enhances the depth perspective and the color).  

While the basic quality video (380p) comes with two formats (for computer and smartphone), the HD quality option comes with four different formats that are suitable for:

  1. viewing on a computer (MP4)
  2. viewing on a HD television (ISO)
  3. using with a HD projector
  4. burning as a Blue-ray disc (or as an AVCHD encodedDVD) for playback on a Blue-ray player

The 480p quality option includes formats 1, 2 & 4 above and adds formats for playback on standard resolution TV’s and smartphones.  However, the HD quality option automatically incudes access to all the lower quality formats. 

In my next post, I will have the completed HD Animoto video available for streaming on the blog and I will explain how I was able to install the video. 

Meanwhile, visit the Animoto site and be inspired by what you can achieve in terms of improved productivity and creativity.

Advanced Podcasting with Audacity


I use Audacity for recording many of my podcasts – it’s free, easy to use and you can add music to your podcast. You simply save your podcast as an MP3 and then you can upload it to your website, blog, Squidoo lens or other social media site. Here’s the link for downloading Audacity:
http://audacity.sourceforge.net/

Audacity is used by music professionals for mixing and re-mixing music – it has a sophisticated range of options. However, you can use it for basic audio recording. A similar analogy is your own computer which often has lots of bells and whistles that you don’t ever use.

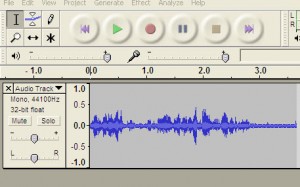
The above image is a screen shot of an audio capture with Audacity.  You can see the simple buttons for rewind, forward, record, pause, stop and fast forward (just like any video player/recorder).

To edit, you just highlight the piece you want to delete (for example, a cough or a silence) and it is removed from the recording.

Audacity comes with full tutorial support to show you how to do any task related to recording and editing your podcast (so there is no excuse!!):

http://audacity.sourceforge.net/help/

The secret as in a lot of social media marketing is to start slowly and then expand your learning edge.  Try out some short recordings first and have a go at editing.  Once you are comfortable with that you can extend the recordings and/or add music.

Adding music to your Audacity podcast

You can add music to the beginning and/or end of your podcast if you want.  Alternatively, you can play music in the background of your podcast.

One source of music loops that I use and recommend highly is Ginny Culp productions.  Ginny also provides free access to her Instant Audio Player through the following URL:Preview

Instant Audio Player

Here’s a sample of an early podcast I produced.  Here I have used Ginny Culp’s free audio player to display and play the podcast.
Instant Audio Player


In a recent post, I highlighted the value of podcasts in providing you with another channel for communicating to customers, building your relationships and marketing your small business.  Audacity makes this easy by providing you with a tool to create a professional podcast at no cost.