What If You Don’t Like the Search Queries Results You Are Getting?

search queries webmaster tools

search queries webmaster tools

In a previous post, I discussed how to register with Google’s Webmaster Tools and how to identify the results for search queries that bring people to your website.   The search queries results may not be what you were expecting and may, in fact, be quite disappointing.  So why would this be, given all the hard work you have put into writing content for your site?

The search queries results provide invaluable data about your site and how it is viewed by Internet searchers.   Before you do anything else, just check the filters (e.g. geography) that you have used to report the data.  It may be that you have excluded a search query from your results because of the filters you have used in reporting the search queries results.

One of the core reasons that your search queries results will differ from your expectations is the relevance of both your content and your site description.

How to improve your search queries results in Webmaster Tools

Let’s focus on relevance because that is the key issue determining whether your site gets included in Google’s search queries results for a particular query.

It may be that Google has not been able to find enough content on your site that is both useful and relevant to Internet searchers who have used a particular search query.   If you are unfocused on your site, trying to cover multiple topics or unrelated topics, both Internet searchers and Google will be confused.  As I mentioned in an earlier post, focus is so critical to your online results and your small business marketing success.

So here are some hints to improve the relevance of your content:

  • Focus on your reader – what is their level of understanding of what you are discussing on your site?
  • What language do your readers use to describe their problems/issues? – you can outpace your reader with your own understanding of a particular issue
  • Find out where your customers are conversing – join in the conversation
  • Be conscious of your marketing style, particularly if you are in the coaching or consulting business
  • Check out Google AdWords Keyword Tool to see what terms people are using to search for information in your niche area – you will often be surprised! (make sure you sign in with your Google account details to get more complete results)
  • Visit blogs that are related to your niche to see what topics people are discussing, the language they are using and the problems/issues they are experiencing (take particular note of the blogs that have lots of comments)
  • Put yourself in your reader’s shoes – what would you be experiencing?, what kind of help would you need?, what would you be talking about?
  • Check out your site’s description as it appears on the Google search queries results – is your site description relevant to what you write about? (if not, change your site’s ‘description meta tag’ or get someone to change it for you).

Just focusing in on the relevance of what you write, and how you write, can go a long way to improving your search queries results.

Do You Know How People Find Your Website on Google?

webmaster tools - menu

webmaster tools


Google’s Webmaster Tools (GWT) show you clearly how Internet users find your website through Google’s search results.  You can learn, for example, what search terms result in your site being displayed and which of these are the top queries for your website. 

Registering with Google Webmaster Tools and verifying your website

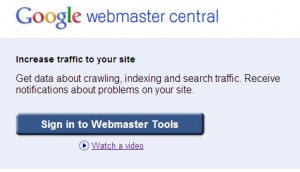
You need to visit Google’s Webmaster Tools site and sign in using your Google account.   This is the image you will see when you visit the site:

Google Webmaster Tools

Just click on the ‘Sign in to Webmaster Tools’ button and follow the instructions to enter username and password.  Once you are on the site, you will see a button, ‘ADD A SITE’ and you will be able to add the web address (URL) of your website.  

Before any results are reported, you will need to verify that you are the owner of the website.  Google Webmaster Tools explains how to do this and one of the options is to copy a verification file to your website (so that Google can check that you actually have Webmaster rights/access to the site you listed). 

Once you are verified, you will then need to be patient as Google takes some time to crawl your site and start reporting results.  I would give it a few days if you want to get anything meaningful.  The Google bots take holidays too – they don’t visit your site every day (unless your site is a really top ranked site or is updated daily and you let Google know about it).

What the Webmaster Tools tell you about how people find you in Google search results

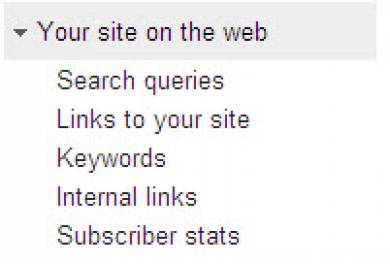
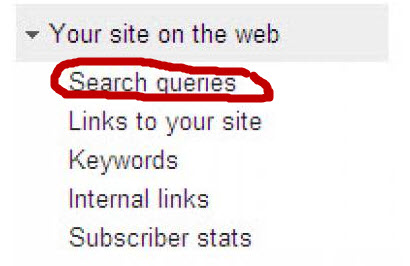
Webmaster Tools provides information to show you how your site is seen on the web – it covers search queries, links to your site, keywords, internal links and subscriber statistics.  This information is accessible via the left hand menu:

 webmaster tools - menu

What I want to focus on in this post, is the ‘search queries’ information and its implications.   If you click on “search queries” in Webmaster Tools, you can find out valuable information about your website: 

  • Queries: the total number of different search queries in Google that resulted in your site being displayed; this is the number of search terms that generated a listing of your site in Google’s search results (for the period you specify). 
  • Query: a search term used by an Internet searcher that resulted in your website being listed in the Google search results; Google lists the top search terms (in descending order of frequency) that result in your website appearing in Google’s search results. 
  • Impressions:  the number of times one of your web pages appears in the Google search results for viewing by someone who searches on Google; Google gives you the total number of impressions ordered by query, along with the percentage change over the previous period.  
  • Clickthrough Rate (CTR): how many times your website impressions (appearances in Google’s search results) produced a click; Google expresses the clickthrough rate as a percentage (number of clicks as a percentage of number of impressions). 
  • Average Position: what position on the search results your website appeared at for a specified query; Google expresses this as an average position and shows the change in terms of ‘+’ or ‘–‘ the number of positions (improvements in position are shown in green). 

So through the Webmaster Tools you can learn the total number of Google ‘queries’ that resulted in your site being displayed.  You can establish what Google search queries were used to locate your site and which of these search terms generated the most traffic.  You can also establish which search terms resulted in the most clicks.   The other valuable piece of information is your average page rank for a particular query (which will impact heavily on your impressions and clickthrough rate). 

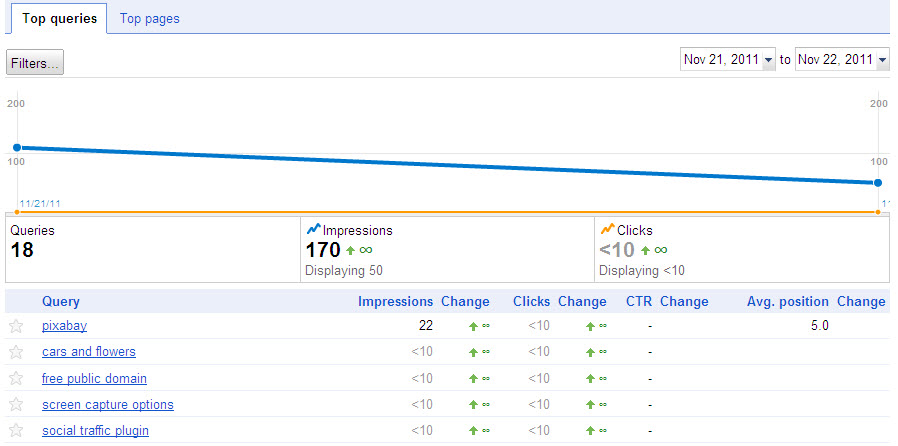
In the following diagram, I show how Google illustrates these results (this is the result over two days for my new site, a day after I registered the site on Webmaster Tools):


 webmaster tools - top queries


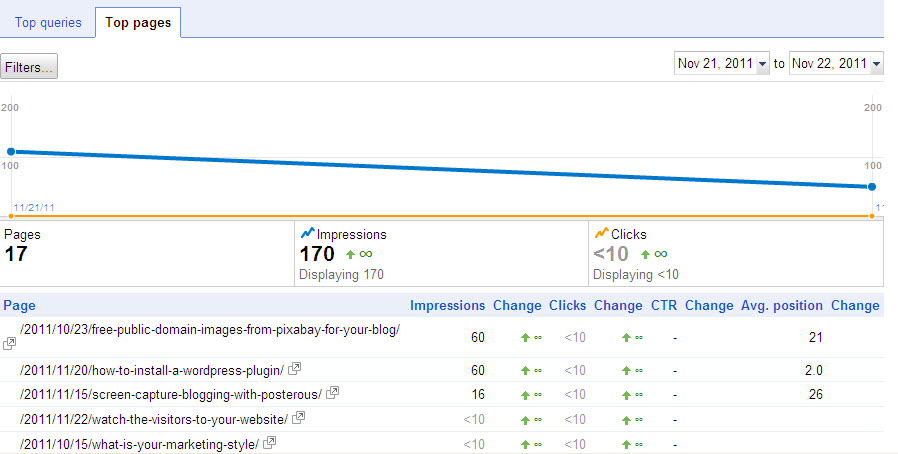
To access this representation of your search queries results, you click on ‘more’ at the end of your ‘query’ listing and the illustration will appear.  The image above is for ‘top queries’ and the illustration below is for ‘top pages’ (you can choose these options by using the tabs at the top left).

 webmaster tools - top pages

At the top on the left hand side, there is a button ‘Filters’ that allows you to set parameters for the displayed information, e.g. by geography.

Mining the riches of Webmaster Tools

There is a lot more to Google’s Webmaster Tools than at first meets the eye.  As you go deeper into this Google tool, you can find a rich store of information that can help your site get indexed better by Google, crawled more often by the Google bots, displayed more frequently in search results and visited more often – it’s up to you to tell Google what you want. 

In subsequent posts, I will explore some of the things that you can do based on other information that is available in Google’s Webmaster Tools:

  • What to do if you don’t like your search query results shown on Webmaster Tools
  • How to improve Google’s indexing of your targeted keywords
  • How to improve backlinking for your website
  • What to do to create more internal links
  • How to create and submit a sitemap
  • What to do about Google’s diagnosis of your website.

These topics alone demonstrate how important it is to use the Webmaster Tools  to understand how people find your site on Google and how Google actually ‘sees’ your site.

iTunes: How to Avoid a Green Screen in Your Video

Green video screen with iTunes

Green video screen with iTunes

For the last few weeks I have been frustrated by a green screen showing on iTunes when I attempt to view a high quality video.   I have been getting audio but no picture apart from an annoying green screen.

I searched the Internet and found many other people were having a similar problem.  Most of the responses to the question, “How do I remove the green screen when I play my videos on iTunes?”, were highly technical.  On one particular site, the technical experts were arguing amongst themselves about what was the best method or who had the best solution.  I found most of the responses somewhat bewildering and confusing.

Green screen on iTunes – a question of codecs?

A codec is the software that video players use to create (compress) a video or play (decompress) the video.  Some video players (such as iTunes) have both kinds of codecs – for creating and playing videos.

It seems that one of the fundamental problems is that the codecs that have been developed for creating videos are outpacing the codecs incorporated in iTunes.   As video creation becomes more and more sophisticated and higher quality, sites that provide video players have to decide how advanced they should make their video players and what level of codecs to employ [the parallel in computing is, “Do you move to Windows 7 or do you stick with Windows XP and put up with conversion problems?].

Some experts in the field suggest you work out the codec you require and download it. Microsoft itself discourages this practice and warns against the the dangers of this action:

Warning

Use caution when installing codecs that you find on the Internet, particularly some of the free codec packs that claim to include codecs from a wide variety of companies or organizations. Incompatibilities are known to exist with some of the components in these codec packs that can cause serious playback issues in the Player and other players, lead to system corruption, and make it difficult for Microsoft Support to diagnose and troubleshoot playback issues.

So what should you do to get rid of the green screen in iTunes videos?

The solution: AVS Video Converter

Finally, after weeks of searching and reading, I have found a simple solution that serves multiple purposes – the AVS Video Converter.  What this effectively does is take a video that uses one set of codecs (such as MP4, usually playable on iTunes) and converts it to a video that uses a different set of codecs (such as WMV, playable on Windows Media Player). 

The besuty of this software, AVS Video Converter, is that you get to choose the final output from a range of options provided.

AVS Video Converter Contol Panel

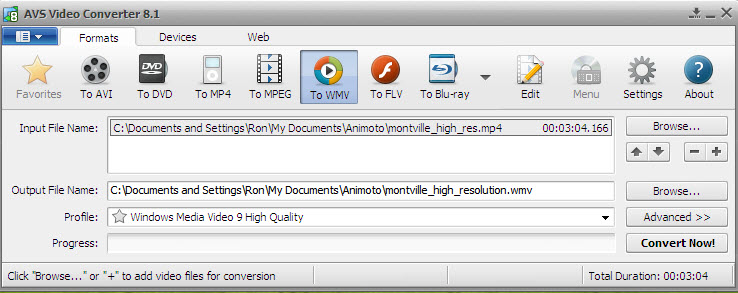
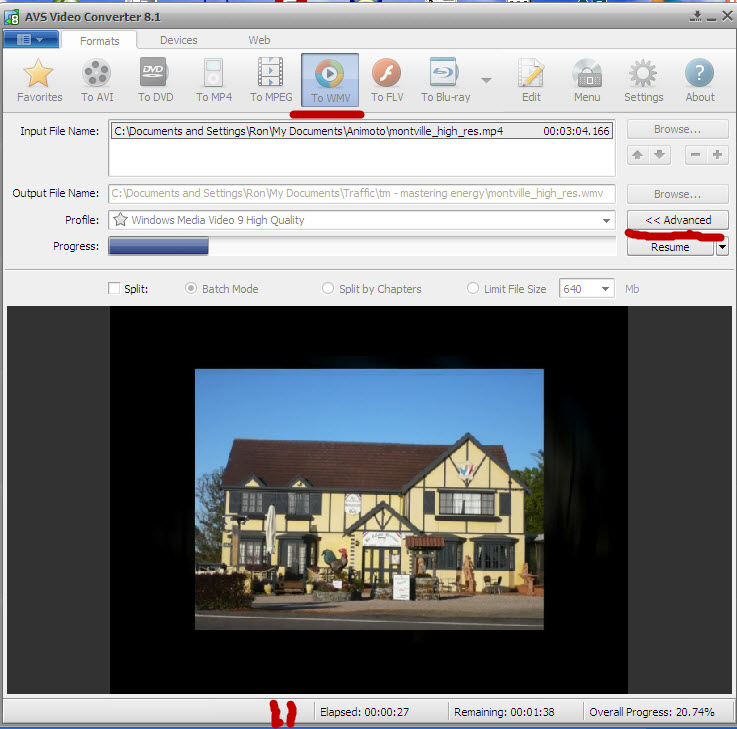
The software is very easy to operate and very reasonably priced.  Here’s a screen capture of the control panel:

avs video converter

You can see across the top, the options for the output (e.g. AVI, DVD, MP4, MPEG, WMV, etc).  All you have to do is highlight the video output type you want, browse your computer to select your video file and specify the folder for the converted video.   The AVS Video Converter retains the high quality of the original video.

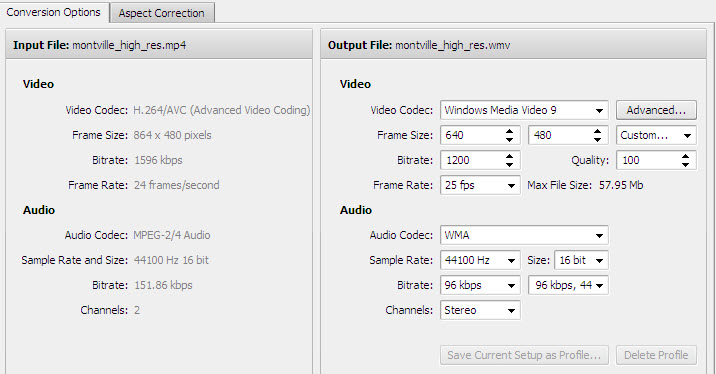
You are able to monitor the planned conversion (before pressing the “CONVERT” button) by pressing the “Advanced” button and the resultant display will show full details of the input and output files (with the relevant video codec identified).


avs video converter


You can monitor the quality of the video as it is being produced by clicking on the arrows beside the “Advanced” button.  You will be able to see “Elapsed” (time taken so far to convert the video), “Remaining” (time required to complete the conversion) and “Overall Progress” (percentage of video conversion).   The blue bar shows visually where the video conversion is up to.   The monitoring screen will also display the image relevant to the location in the video conversion:


avs video converter


Well, the AVS Video Converter solved all my problems with the green screen on iTunes and I converted six videos the day after I purchased the software.

AVS Video Converter:  70% off Sale until 30 November 2011

  AVS Video Converter - 70 % off

The award-winning AVS4YOU software, including the AVS video converter,  is normally offered on an annual fee basis for the whole suite of 18 programs (listed below).  For the month of November 2011, this whole suite of 18 programs is being offered at 70% off for unlimited access (and download) – Price $59.

AVS – Unlimited Access to 18 Software Programs

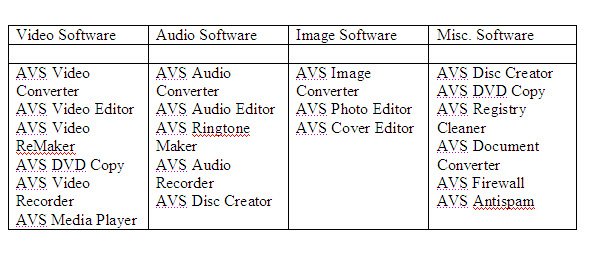
This offer includes free updates and free support.  Here are the 18 software programs in this unbelievabe offer:

AVS software programsIf you want to remove the green screen from videos on iTunes then the AVS Video Converter is the answer – but why not take advantage of the great offer for unlimited access to the whole suite of AVS software programs (while it is on offer in November)?

Auto-Post with Posterous: Leverage Your Hard Work

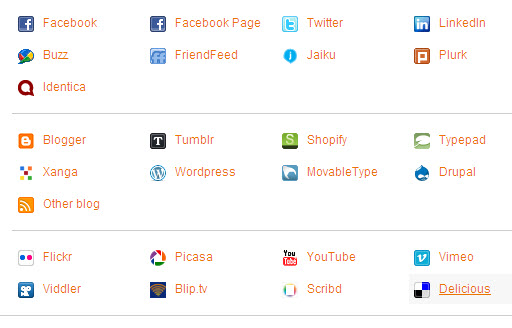
Social Media sites for auto-posting with Posterous

Posterous enables you to broadcast your Posterous blog post (whether or not it was created by email, screen capture or onsite blogging).  You can also specify a target for a specific email post, e.g. twitter@posterous.com.

You can set up the specific accounts in the “autopost” area of your Posterous site to advise where to broadcast your blog post.  The above image lists the social media sites that you can auto-post to with Posterous.

Posterous, through email and screen capture blogging, gives you the power to leverage your online content (blog posts, articles, Squidoo lenses, Hub pages, videos. podcasts).  The autopost facility allows you to levrage your hard work in creating online content by simultaneous broadcast to other social networking sites.

At the time of writing, I have set up my site to post my Posterous blog posts (however created) to my Affiliate Marketing Coach blog (Blogger.com)  and to my Facebook site.    So you can set up a sequence of auto-posting that suits your style of operating and fits with your small business marketing strategy.

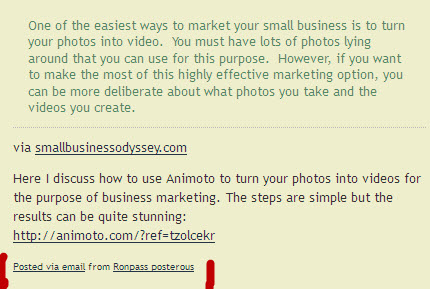
Here is an example of where Posterous has created an autopost to my Affiliate Marketing Coach blog from a Posterous screen capture post I created from this Small Business Odyssey blog:

The original blog post on Small Business Odyssey was posted to my Posterous blog via the screen capture bookmarklet.  I have added a comment and a link to my target URL (automatically hyperlinked) and Posterous has auto-posted the Posterous blog entry to my Blogger.com blog.

You have the option of letting Posterous post directly to each site you nominate or have it feed into one of your sites that is set up to auto-generate other posts.

You are limited only by your imagination with respect to the range of content that you can capture, and the means of achieving leverage.  In this example, my AudioBoo podcast is automatically posted to my Posterous account which in turn posts to my blog, Twitter and Facebook:

 Posterous and AudioBoo autopost

So there are a number of options for using the autopost feature of Posterous.  Here are three of them:

  1. Allow Posterous to autopost directly to your selected social media sites
  2. Allow Posterous to autopost to another site (e.g. Twitter) which in turn is set up to autopost to other sites (such as Facebook)
  3. Allow another site (e.g. AudioBoo) to autopost to your Posterous blog and setup the latter to autopost to selected sites.

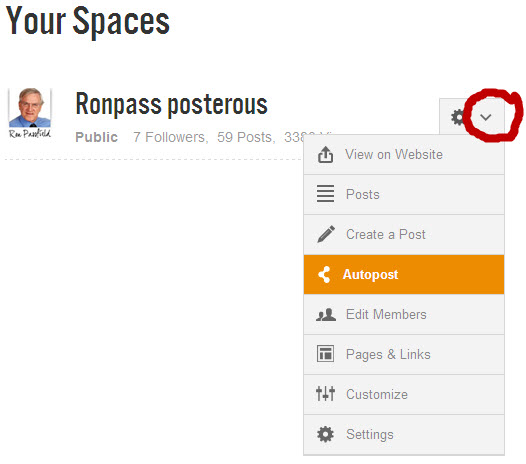
The autopost option is located under “Manage Spaces” – you need to click on the down arrow as highlighted in the image below so that the menu displays with the autopost option:

Posterous autopost

Posterous through its email blogging and screen capture blogging supports an array of options for auto-posting and creating leverage for your online content as part of your small business marketing.

Screen Capture Blogging with Posterous

posterous screen capture blogging

posterous screen capture blogging

Posterous provides screen capture blogging in addition to the email blog discussed in my last blog post.

You can add the Posterous bookmarklet to your browser and you will have unlimited screen capture options to use as Posterous blog posts.  You can capture photos, video, podcasts and text to add to your blog.  The bookmarklet supports numerous sites such as YouTube, Dailymotion, Vimeo and Metacafe.  Posterous, through its screen capture technology, automatically tries to find flash embeds and large images so that your videos and podcasts can be played on your Posterous blog.

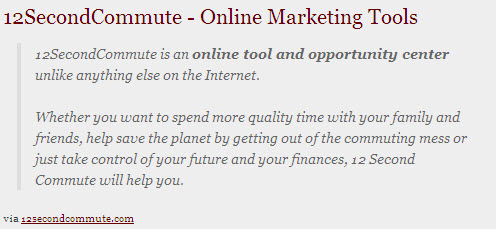
What you do is highlight the area of screen that you want to capture and click the Posterous button in your browser (you need to be logged into Posterous – you can stay logged in as an option).  There is an example of text capture from the 12SecondCommute website in the image at the top of this post.

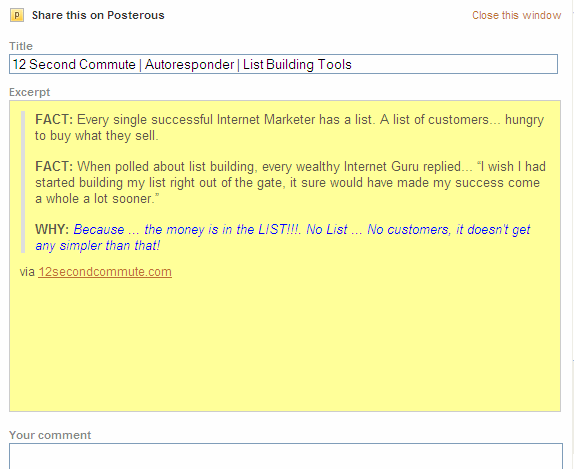
When you use the Posterous bookmarklet for screen capture you can add comments to the captured image together with a hyperlinked URL  Here’s an example of a text screen capture and the provision for a comment on the Posterous extract: 


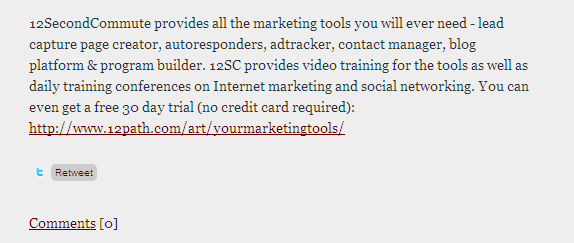
Ideally, you would make a 100 word comment that is keyword rich and adds to the information in the screen capture window.  The comment would also include a link to your target website/blog.  Here’s an example comment created in relation to the text screen capture at the top of this post:

Posterous comment

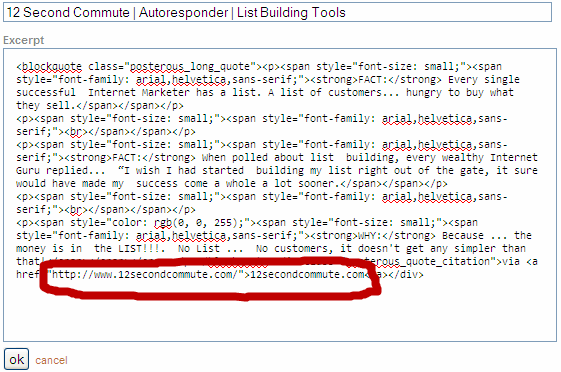
Posterous automatically records the URL of the screen capture and adds it as a hyperlink.  However, you can edit the screen capture and URL displayed before posting to Posterous.  You do this by clicking on the text/image displayed in the screen capture and this will result in a window displaying the HTML code for editing.  You can just highlight the relevant text or link and replace it with the desired information:

editing Posterous screen capture

Screen capture blogging with Posterous is another great option for small business marketing online as it is easy to use and is very versatile.