Why Use LinkedIn Ads for Small Business Marketing?

Targeting a group on LinkedIn

Targeting a group on LinkedIn

LinkedIn Ads have a number of distinct advantages for small business marketing, particularly for businesses in the professional sector.   We decided to use LinkedIn Ads to raise awareness of, and participation in, one of our new training workshops.   This approach was designed to complement our normal email marketing campaign for our human resource consulting business.

Linkedin Ads is much the same as most click-based advertising programs, and just like Facebook Ads, you can segment your target audience.  What makes this targeting more valuable and relevant is that you can target your audience based on their current professional status or career interests.  In contrast, Facebook Ads tend to focus more on lifestyle interests, while Google Adwords enables targeting geographically by search terms/keywords.

LinkedIn Ads: The Advantages

The advantages of LinkedIn Ads revolve around targeting/segmenting features and cost structure.   The key advantages for us were:

1.  Ability to target professionals and business people

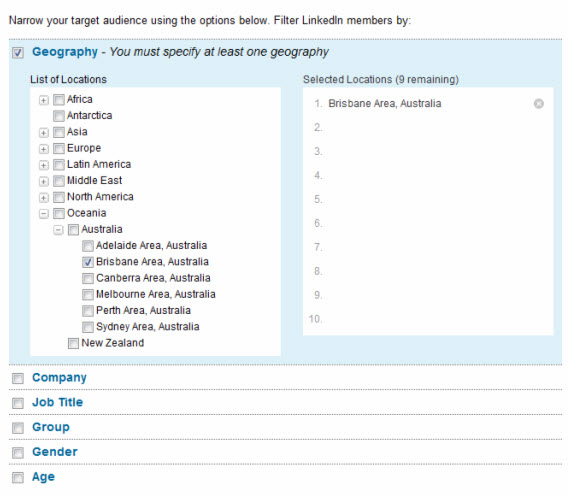
We could select a target audience based on Location (capital city, state, country), Gender and Age and then segment them further by selecting Companies they work for, Job Titles or even a Group they had joined.

target marketing on LinkedIn


2,  Option to run your campaign for different target audiences

We focused on three different target audiences in this campaign – (1) people in Senior positions (as our workshop focuses mostly on managers and team leaders),  (2) those that worked at specific Companies and (3) those who belonged to certain Linkedin Groups (usually professionally based).

3.  Ability to create up to 15 variations of an ad

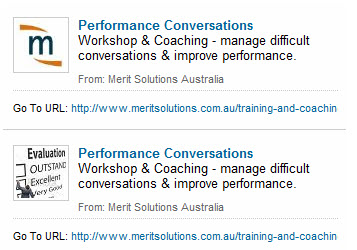
Initially we had two variations – each had the same copy but with different images. Eventually we added more variations to include Call to Actions. We ended up with 12 variations in total.

4.  Relatively cheap for a highly targeted service

As with most click-based advertising, you have the power to set your daily budget and how much you are willing to pay for each click. While Linkedin Ads do have minimum amounts that you could set ($2.00 per click and $10.00 daily budget), these were relatively inexpensive considering how targeted you could make your audience, ensuring that only the most relevant people are viewing your ads.

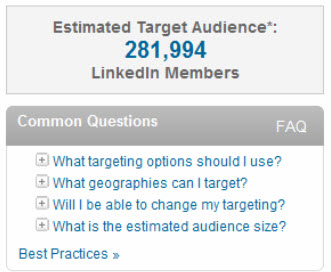
Related to this last advantage is the capacity to view in advance the numbers that make up any specific targeted audience – so you can very quickly see whether the target audience is too large or too small.  The following illustration shows that one of our earlier choices of audience resulted in an estimated target audience of 281,994.

estimated target audience for LinkedIn Ads

Linkedin Ads: The Disadvantages

Two distinct disadvantages from our first experience of LinkedIn Ads were:

1.Actual reach

 With the option to target your audience as broad or as narrow as you wish – we found that the more we wanted to tailor our campaign, the less people we could reach.  While this sounds like common sense, it still felt restricting – we were not able to fine tune our targeting as much as we would have preferred to because the estimated target audience was in the low hundreds.   This disadvantage could be a function of the location and population mix.  The same audience choices in aUSenvironment would have resulted in much larger numbers.

2.  Relatively low click through rate (CTR)

There were tens of thousands of impressions of our ads in the 2 weeks that we ran this campaign but we only received a .022 CTR (22 clicks per 1,000 impressions).  This could be influenced by the nature of LinkedIn and the regular behaviour of the audience (high resistance to online ads?).  Another influencing factor would be the quality of our ads – title, description and the image.

What we learned from this experience of LinkedIn Ads

Our key learning related to the nature of the image, the click behaviour of specific audience types and the impact of ad changes mid-stream in a campaign.  Here are the key findings:

1. The image used makes a difference

In choosing an image, the audience clicked on the company logo image more often than a content-related image.  This stat could be influenced by the fact that our logo is recognised in the marketplace after 15 years in operation.

Images for LinkedIn Ads

2. The more senior group (higher organizational ranking) generated the most clicks.

 By contrast, the campaign that targeted “Groups” was the least successful.   What would influence this latter result is the nature of group membership (focused on discussion, not ads) and the perceived relevance of the ad to the focus of the group discussion.

 3.  Creating different variations in the middle of the campaign did not help at all and may have possibly harmed our campaign. Clicks almost immediately halted after releasing variations and very few clicks in total were gained from the new ads then from the original ads.

Why use LinkedIn Ads?

LinkedIn Ads provide a particular form of targeting because of the professional/vocational focus of the membership.  We were able to learn a few things in our first campaign on LinkedIn.   There’s a lot of trial and error with any form of click-based advertising.   Patience is required along with a good analysis of your campaigns.   Constant review and matching of all elements – heading, description, image and audience – are essential for success with LinkedIn Ads.

Expand Your Business Through Your LinkedIn Connections

LinkedIn for small business marketing

 LinkedIn for small business marketing LinkedIn is the world’s largest online professional network with 130 Million members and thus provides a great opportunity for small business marketing.  It represents a powerful network of educated, affluent and influential people. 

Unlike Facebook and YouTube, which were established primarily for entertainment purposes, LinkedIn was created to develop business/professional connections.  Once again, this background and purpose shape the etiquette and usefulness of this social networking site.

LinkedIn is used for multiple purposes by different groups of people.  Employers seek out potential employees, job applicants display their work/professional knowledge and experience and business people seek to expand their professional and industry networks and locate business partners.  Increasingly, employers are looking at the “Internet Footprint” of potential employees and LinkedIn has a pre-eminent status in this evaluation.  Some organizations actually acknowledge that LinkedIn is their sole or primary source of job candidates.

For small businesses and Internet marketers, LinkedIn is a superb way to build a brand/profile that is professional and grounded.  At the personal level, LinkedIn enables you to enrich your Internet profile by bringing both your offline and online knowledge and experience to the fore.  It provides, like Facebook, the opportunity to integrate the personal and professional.

Here are some indicative facts about LinkedIn:

  • LinkedIn is ranked the 13th most visited site on the Internet (12th in the USA) – it ranks in the top ten sites in countries like Netherlands, India and Ireland
  • LinkedIn has a Page Rank of 9/10.

These stats highlight the power of LinkedIn as a medium for marketing and establishing a real professional presence on the Internet for yourself and/or your business.

If you have a LinkedIn profile, it will typically appear on the first page of Google results for a search on your own name or a search on a small business that you are part of.  For example, if you search on the name of my small business, Merit Solutions Australia, you will see a number of individual LinkedIn profiles and the company’s LinkedIn profile on the first page of results.

From a search engine perspective, LinkedIn provides an excellent forum to capture attention and generate traffic for your website, company or products/services.

LinkedIn membership: the audience for small business marketing

LinkedIn is a superb site for building your online social network and creating new business connections. Here’s some interesting information about people on LinkedIn that is relevant to small business marketing:

  • LinkedIn is 59% male and 41% female
  • 78% of LinkedIn members have a college or postgraduate qualification
  • 69% of the people on LinkedIn live in theUS
  • Average household annual income for LinkedIn users is over $100,000
  • LinkedIn visitors spend about eight minutes on the site per visit and tend to browse the site from work rather than home
  • 3 out of 4 LinkedIn members use the site for things related to their business – developing relationships, new business and business news
  • Compared with the overall internet population,

LinkedIn profiles show that:

– LinkedIn users are disproportionately well educated and affluent

– LinkedIn has a very strong representation of key business decision makers

– 18 to 24 year olds and people over 65 years are under-represented

– representation of other age groups is similar to the general Internet population.

[Sources (used with some statistical license):  http://advertising.linkedin.com/audience/  & http://www.alexa.com/siteinfo/linkedin.com ]

Small business marketing on LinkedIn

As an overall observation, it is important to remember that heavy selling and overt, continuous promotion on LinkedIn breaches the etiquette of this professional network and will result in complaints and being ostracized. Besides if you are using this site to promote yourself and/or your business, it is essential that you present a professional demeanor and respect the rights of other people on the site.  In a previous post, I listed ten top tips for small business marketing on LinkedIn.

LinkedIn is a powerful social network for small business marketing as it provides a superb opportunity to develop your professional profile, create connections and build your customer base within a highly ranked, expanding business network.

Diagnosing Your Website Using Google’s Webmaster Tools

diagnostics - webmaster tools

diagnostics - webmaster tools

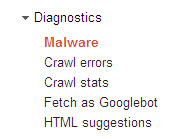
Google’s Webmaster Tools provides a set of diagnostics that enable you to make necessary repairs to your website.   The information covers issues like the presence of Malware, duplicate pages, missing links (404 errors) and suggestions re improvement in HTML.   So it seems the Google Bots are not so lazy after all!

Some of the information provided by Webmaster Tools gets very technical, so you may want to get your Webmaster to have a look at the diagnosis (or get a knowledgeable friend or family member to do so).   However,  you should be able to act on some of the information yourself and I will confine myself to a couple of these aspects.

Identifying and removing Malware

Webmaster Tools, as indicated in the above image, provides information about Malware that is affecting your website.  According to Malwarebytes, Malware represents 97% of all online threats.  Malware enables the perpetrator to steal your personal information (passwords, logins, etc) and disrupt your computer.  Malware includes computer invasions such as ‘viruses, worms, trojans, rootkits, dialers and spyware’.  Your Webmaster Tools will identify the threats and give you links for advice on how to remove these threats.  A better way to go is to be proactive and use a program that will detect, prevent and destroy malware.  The Anti-Malware program that I use and that is recommended by many technical experts (100 million downloads worldwide) is Malwarebytes.

If you take the opportunity to protect your website with an anti-malware program, then you will see the following message from Google’s Webmaster Tools (reported about my Small Business Odyssey site):

Google has not detected any malware on this site.

Clearing out duplicate webpages

The Webmaster Tools also advise other problems with your website that can be readily rectified.  One of these is where you have duplicate pages on your website.  Sometimes, you may have created a new version of an old page and accidentally left the old version on the website, resulting in duplication of the page.  This happened recently with the website for my own human resources business.  Google’s Webmaster Tools will advise you of this duplication under the ‘HTML suggestions’ menu item (see image above).  The duplicate pages I identified were listed under the sub-menu item, ‘Pages with duplicate meta descriptions’ (in other words, with substantially the same title).

Dealing with 404 errors – page not found

These ‘page not found’ errors (404) are reported under ‘Crawl errors’ (see image above – it means you’ve upset the Google Bots because they can’t find the webpage that was supposed to be present).  404 errors can occur because you have removed a page which is still showing in Google’s version of your sitemap or because the page you linked to no longer exists for some reason.  The Google Bots try to follow the links on your site and when they see a deadend, they report it as a 404 error. 

I recently found a series of 404 errors on the website for my human resource consultancy business as reported in Webmaster Tools.  These errors resulted from the fact that we had changed the default ‘permalink’ for the titles of our blog posts (changed from an auto-generated number to the title of our blog posts).  The result was the following type of errors reported in Webmaster Tools under ‘Crawl errors”:

Webmaster Tools


Webmaster Tools - 404


Where possible, you should clean up broken links and, where appropriate, resubmit your sitemap so that Google has a more up-to-date version to follow.

Through its Webmaster Tools, Google gives you a lot of information to help you to keep your website functioning  properly and to make it easy for the Google Bots to index your website effectively.

Tell the Google Bots Where To Go!

Lazy Bot

site map with links


When I discussed Webmaster Tools earlier, I mentioned the need to create a sitemap for your website and submit it to Google.  I will discuss how to do the creation and submission of a site map in this post because it is critical to the indexing of your website by Google and determines how your website will be found through search queries on Google (and other search engines).

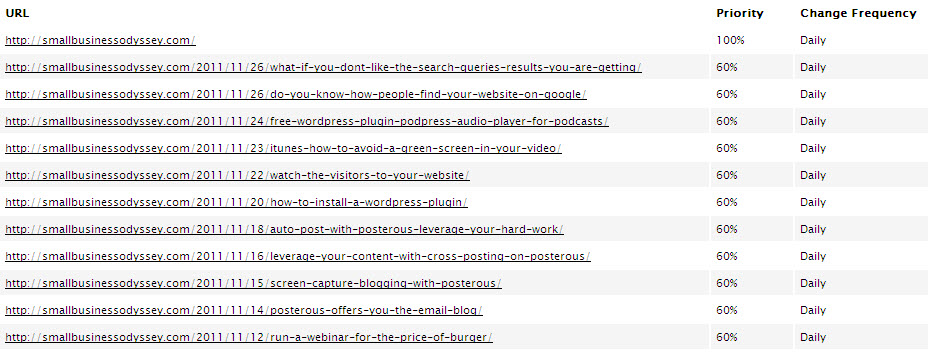
A sitemap is basically, as the name suggests, a map or directory of your website, so that the structure and priority of the files on your website can be displayed for easy access by the search engines.   You can see from the sitemap extract above that the sitemap for Small Business Odyssey has a hyperlinked list of files, a priority rating (percentage) and a frequency rating (to tell the search engines how frequently to index that part of the website).  

Why create a sitemap and why submit it to Webmaster Tools?

Lazy BotWell, in non-technical language, it seems that the Google Bots (robots that crawl your website) are lazy ‘creatures” and do not go out of their way to properly index your site for the Google search engine.  They take the easy way out – they only go where the path is clearly laid out for them.  They don’t like deadends (broken links) or confused pathways (disconnected files randomly located).   When I look at how Google is currently indexing my Small Business Odyssey blog, I am even more convinced of how lazy the Google Bots are – it seems that they need to be spoon-fed the information, otherwise they do a poor job of indexing your website.

So the primary reason for creating a sitemap for Google is to enable the Google Bots to comprehensively index your website.   Otherwise, a lot of your website may not appear in Google’s index and will not be found by Internet searchers.  Google admits as much by this comment on Webmaster Tools:

Submit a Sitemap to tell Google about pages on your site we might not otherwise discover.

Creating an XML Sitemap

This brings us to the creation of a sitemap.  I am suggesting that you create this sitemap initially as a .XML file because it is easy for the lazy Bots to read completely.  This sitemap format basically lets the Google Bots into the back engine room of your site and shows them around – where files are located and how they are linked by type (home page, static pages, dynamic pages, categories, tags).

If this post appears too technical for you, just make sure that your Webmaster has created an XML sitemap for your website and submitted it to Google.  

Here are the steps for creation of your XML sitemap:

  1. Download the free WordPress Plugin for the Google XML Sitemap Generator.
  2. Upload the XML Sitemap Generator to your website (via your WordPress Admin panel)
  3. Make adjustments to the default settings (if you wish)
  4. Click ‘create sitemap’ and you will very quickly have a site map and a stated location (URL) for your sitemap.

The beauty of this WordPress Plugin for creating Google XML Sitemaps is that it offers multiple options in terms of settings, automatically submits the sitemap to Google, Ask.com and Bing search engines and updates automatically when you change a file on your website.  So it is comprehensive and dynamic.

In terms of adjustments to default settings, most commentators suggest that you leave the defaults as they are – it certainly makes life simpler.  However, I would suggest that you may want to change the default for ‘priority’ – the default setting tells the Google Bots to give priority to the posts that have the most comments.  This may not be meaningful if you have a really new site.  I have set up my priorities in the following order –  home page, recent posts, static pages, older posts, categories and tags.  I will change this as the Small Business Odyssey site becomes more established and generates more traffic and comments. 

The other default setting you may want to change before you click the “create sitemap’ button, is ‘Change Frequency’. For example, the default setting tells the Google Bots to index your posts weekly.   However, if you are creating blog posts on a daily basis, you should change the ‘frequency’ to daily.  The Google Bots may ignore this suggestion (remember they are basically lazy), but it is better to at least express your wishes.  Google’s own experts, such as Matt Cutts, tell us that the more frequently you update your site with relevant information, the more often the Google Bots will crawl your site and the deeper (more thoroughly) they will index your website.

I’ve made a few adjustments to the priority and frequency default settings for my XML sitemap and you can see the result here:

http://smallbusinessodyssey.com/sitemap.xml

Here’s a YouTube video that simplifies the whole process and shows you exactly what to do (there are no adjustments to defaults and the WordPress Plugin is downloaded directly to the Admin panel via the built-in Plugin search facility): 


How to submit your XML sitemap to Google’s Webmaster Tools 

You might wonder why we need to do this extra step as the WordPress XML Sitemap Generator automatically submits your sitemap to Google (and to Bing and Ask.com).  Well, I think it comes back to our lazy Google Bots again – they don’t go out of their way to find the sitemap, so you have to put it in front of them!   If you check out the screenshots below, you will also see how Google takes up the information from the sitemap on Webmaster Tools and begins to integrate it into its index.  So submitting the sitemap to Google’s Webmaster Tools is a way to get direct access to Google’s index (although it may take some time for all of the information to be indexed).

The process of submission of your sitemap to Google’s Webmaster Tools is very simple:

  1. log in to your Webmaster Tools site
  2. click on the web address (URL) for your verified website 
  3. click the ‘site configuration’ menu item
  4. click the ‘sitemaps’ menu item
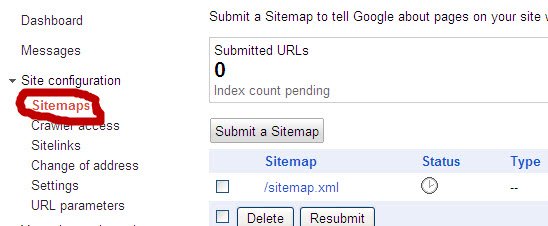
  5. enter your sitemap address where indicated (see image below).

  sitemap submission to webmaster tools

When you first submit your sitemap, the above image will appear with the messages ‘submitted URLs – O’ and “index count pending’ (and status shown as ‘in progress’).   Take heart, this is Google trying to identify all your files from the sitemap and integrating them into their index.   After some processing time, you will see the following image that indicates successful submission:

Google indexing sitemap on Webmaster Tools

So this indicates that Google has taken on board your website pages (URLs) and has loaded them into their index.  The actual indexing in terms of search terms (keywords) will occur over an unspecified period (you can’t rush the Google Bots).

Creating and submitting an XML sitemap to Google’s Webmaster Tools is critical for small business marketing because it ensures effective indexing of your website so that Internet searchers can find your website through your targeted search terms (keywords).

What If You Don’t Like the Search Queries Results You Are Getting?

search queries webmaster tools

search queries webmaster tools

In a previous post, I discussed how to register with Google’s Webmaster Tools and how to identify the results for search queries that bring people to your website.   The search queries results may not be what you were expecting and may, in fact, be quite disappointing.  So why would this be, given all the hard work you have put into writing content for your site?

The search queries results provide invaluable data about your site and how it is viewed by Internet searchers.   Before you do anything else, just check the filters (e.g. geography) that you have used to report the data.  It may be that you have excluded a search query from your results because of the filters you have used in reporting the search queries results.

One of the core reasons that your search queries results will differ from your expectations is the relevance of both your content and your site description.

How to improve your search queries results in Webmaster Tools

Let’s focus on relevance because that is the key issue determining whether your site gets included in Google’s search queries results for a particular query.

It may be that Google has not been able to find enough content on your site that is both useful and relevant to Internet searchers who have used a particular search query.   If you are unfocused on your site, trying to cover multiple topics or unrelated topics, both Internet searchers and Google will be confused.  As I mentioned in an earlier post, focus is so critical to your online results and your small business marketing success.

So here are some hints to improve the relevance of your content:

  • Focus on your reader – what is their level of understanding of what you are discussing on your site?
  • What language do your readers use to describe their problems/issues? – you can outpace your reader with your own understanding of a particular issue
  • Find out where your customers are conversing – join in the conversation
  • Be conscious of your marketing style, particularly if you are in the coaching or consulting business
  • Check out Google AdWords Keyword Tool to see what terms people are using to search for information in your niche area – you will often be surprised! (make sure you sign in with your Google account details to get more complete results)
  • Visit blogs that are related to your niche to see what topics people are discussing, the language they are using and the problems/issues they are experiencing (take particular note of the blogs that have lots of comments)
  • Put yourself in your reader’s shoes – what would you be experiencing?, what kind of help would you need?, what would you be talking about?
  • Check out your site’s description as it appears on the Google search queries results – is your site description relevant to what you write about? (if not, change your site’s ‘description meta tag’ or get someone to change it for you).

Just focusing in on the relevance of what you write, and how you write, can go a long way to improving your search queries results.